Lupita Nyong’o US Vogue October 2015. Makeup by Nick Barose for Lancome and hair by Vernon Francois. Image source Huffington Post
When the first pictures of the October Vogue cover crossed the news feeds, we all collectively gasped and shouted ‘Yaaaaasssssss!’. ‘Yaaaaaaaasssssss!’ Lupita slayed! The look is not overly fancy but super luxurious and I knew instantly I had to recreate the look. Although it is 2015, seeing a woman of colour in on a major magazine cover is still quite uncommon and they often share covers during the same month. So *obviously* , I had to go out and buy it. As I flipped through her spread, I was so impressed! She is not a model, but between the herself, the stylists/artists and who ever organised the shot did a fantastic job! They knew exactly what would look amazing on her! And could we for a moment talk about her skin? Gawd! Like butter! Just proves that amazing skin and skincare should be the focus of your beauty routine. And her hair! Love when she wears a side part and I also love that she is always switching it up. You can totally have short, natural hair and it can be so versatile.
So I selected the picture of Lupita in the gorgeous blue dress by Givenchy by Riccardo Tisci Haute Couture.

UGHHHHHHH! This dress! This look!! Source
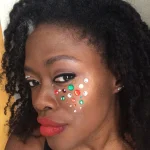
The focus of the makeup look was flawless skin and deep aubergine lip, but there was also a hint of green colour surrounding the eyes. It’s a very wearable look, not overworked, not over contoured/highlighted, but is bold and packs a punch!
Here is what I came up with.


I experimented with a few hairstyles, but thought that keeping my hair down with a side part was best. Hair in a twistout.
All the details of the look are listed below. Let me know what you think!
THE DETAILS -Lupita’s Cover Look
Skin
Moisturise to hydrate the skin and to help the foundation to adhere better to the skin.
Make Up For Ever Ultra HD Invisible Finish Foundation in R530 (180). Applied with a stippling brush (M.A.C. #131) for an almost not there coverage.
Brows
I went for a more defined, bolder brow. Not heavily sculpted. Anastasia Beverly Hills Brow Wiz Pencil in Dark Brown and Tinted Brow Gel in Espresso.
Eyes
I saw that there was a pop of colour around the upper and lower lashline but the rest of the eye was neutral and lightly contoured.
Colourpop Super Shock Shadow in Intoxicate, which is slightly lighter than my skin colour all over my eye lid, using my finger. Colourpop Super Shock Shadow in Mittens, which is a darker chocolate brown in the outer third of the crease using a fluffy, blending eye shadow brush, Sigma E25. This softly applies colour to the crease. We are not looking for a harsh line. I mixed a couple of different darkened emerald/hunter shimmery green, but use anything you have. Here are some options – M.A.C. Mineralize Eye Shadow in Dark Indulgence, Smashbox Photo Op Eye Shadow Trio in Quick Take (the colour Serpent), M.A.C. Eye Shadow in Humid, Milani Cosmetics Bella Eyes Gel Powder Eyeshadow in Bella Emerald. I used a short stiff brush to apply to my upper lashline and winged out that colour using a fluffy brush. I also applied the colour to my outer crease, creating a “V” shape to the outer corner of my eye. To my lower lashline, I wanted to intensify the green colour a little bit more, so I applied a green liner (tarte cosmetics skinny smolderEYES in Azurite Green) and the green eyeshadow to the outer and middle lower lashline. On the inner third of the upper and lower lashline, I applied a warm, darkened gold shimmer, to bring some more light to my eyes. Here I used Inglot Eye Shadow in 606. Lots of mascara on both the upper and lower lashes, Chanel Le Volume de Chanel in Noir. I did not use any black eye liner, it is al about the colour giving the eye some shape.
Cheeks
Did not do much here. Selected a very neutral blush and a very subtle shimmer highlight (Hourglass Ambient Light in Radiant Light).
Lips
Here is where the focus is. I used a dark, blackened burgundy lipliner, M.A.C. Lip Pencil in Nightmoth. To create the deepness and the shine of Lupita’s lips, I mixed a few colours. I first started with Smashbox Be Legendary Lipstick in Black Plum, but that was too sheer. I wanted an opaque, intense colour. Then I mixed NARS Audacious Lipstick in Liv and OCC Lip Tar in Black Metal Dahlia. NARS’ Velvet Matte Lip Pencil in Train Bleu or Melt Cosmetics Dark Room Lipstick would also be beautiful here, all you are looking for is a deep plummy colour.
That’s it!
Laters!
Related Posts
Related Posts:

Noire Tropical Beauty
An island girl living in the Big Apple. She hails from the twin island Republic of Trinidad & Tobago but currently reside in the beauty/fashion capital of the world, New York City (Harlem to be exact!). She is passionate - well, obsessed - about beauty and in addition to blogging, she is also a corporate beauty professional and a budding web designer/developer. She loves combining her in-depth, practical knowledge with her chemist/scientific training to make your cosmetic choices fun and easy. She likes to take the guesswork out of beauty, separate the hype from what really works, to help you bring out the most beautiful you! She loves colour, and makeup, and she has been natural for years! She also loves great food, culture, sports and laid back vibes! Check out some more about me here and if you like this post, sign up to my newsletter to get updates on what I am craving right now.